|
Hottop Americas
Hottop Coffee Roaster
Repair Procedures
|
|
|
Hottop Americas
Hottop Coffee Roaster
Repair Procedures
|
|
|
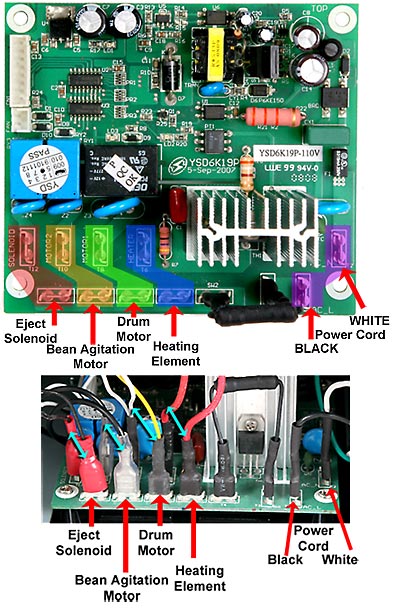
Each of the following repair procedures outline the process to remove and replace parts of the Hottop Coffee Roaster. They are presented here for your convenience and for educational purposes. Before attempting any of the following procedures, be sure read through the procedure thoroughly and be sure that you are comfortable with the steps listed therein. The procedures are written with a certain amount of information taken for granted such as, but not limited to, the proper use of hand tools and dealing with the splicing of electrical wires. These are not written as, nor meant to be a comprehensive repair guide. These procedures have been created over time and so some of the parts shown are from earlier models. Some parts of more current models have been updated since the introduction of the first KN-8828, so the procedures may vary slightly for older models. Where there is a difference we have attempted to mention it. If you have any questions please feel free to contact us by E-mail at hottop@hottopamericas.com before proceeding. For all procedures it is best to remove all "loose" parts of the machine before beginning- these include the cooling tray, rear filter, and bean chute cover. It is also helpful to remove the drum as this makes the machine lighter and easier to handle. HELPFUL TIP: Because of the variety of screws used in each roaster, and the changes the factory has made over time in its choice of screws, you will benefit greatly by being organized when disassembling your roaster. Small plastic contianers with lids will work great. For example, take the main fan off and put the four screws into one container, and place a label in the with the screws to identify them. You will benefit when, if you have to order parts, when they arrive in a week or two you won't have to spend an hour figuring out what screw goes where. For more helpful hints like these, see our "User Repair Tips" article.
CAUTION: Some parts of this machine have sharp edges and other cutting hazards. Take care to protect yourself and the electronic and electrical components of this machine from sharp edges as you work. CAUTION: There are electronic components in this machine that can be damaged by static electricity. Take static precautions when handling the electronic components or their connections. |
|
|