Click on the small images on this page to see a higher-resolution version of the image. The larger image will open in a new window that can be closed after viewing
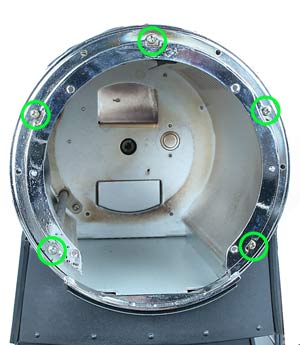
Place an indicating dot made with a permanent marker to note the locations of the five screws shown here to make reassembly easier. While holding the Bezel in place, remove the five screws. Once the screws are removed the Bezel can be removed.
CAUTION: Use care when removing the bezel. The top cover can be under some tension and can pop open unexpectedly when the bezel is removed, relieving that tension. Gloves should be worn during this step.
2
Here is a view of the front of the machine with the Bezel removed. The five locations where the screws will attach are indicated. The five screws marked with the red, slashed-out circles are NOT USED! As shown in the inset image marked in blue outline, all five of the tabs where the screws attach are part of the Roasting Chamber and NOT part of the top cover. No screws attach to the front of the Top Cover.
3
To reinstall the Bezel, hold the Top Cover in place while placing the Bezel over the front of the machine. Be sure that the Top Cover is captured by the Bezel, and that the Bezel is flush against the front of the machine. It can be very helpful to have an assistant to hold the top cover in place to relieve its tension so that the screw holes in the tabs of the can be aligned with teh holes in the Bezel. Do not over-tighten the screws!.