Repair Procedure
Control Panel
Repair Procedure
Control Panel
Click on the small images on this page to see a higher-resolution version of the image. The larger image will open in a new window that can be closed after viewing
|
|
| 1 |
Although not always necessary, if you have difficulty following this procedure it might be helpful to:
Remove Fan
Remove Rear Cover
This gives you some access to the rear of the Control Panel and its attachment tabs.
|
|
| 2 |

|
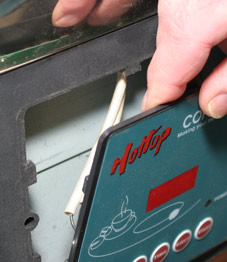
Begin by pulling up one of the upper corners of the control panel just enough to....
|
|
| 3 |
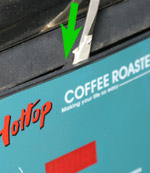
|
...allow you to place a screwdriver's blade between the back surface of the control panel and the side of the machine exactly in the center of the control panel. There is only one retaining tab along the top edge and it is located right in the center. The use of a strong light will assist you in locating it if you need to see where to place the screwdriver. (Note: covering the blade of the screwdriver with a layer of tape will help keep you from scratching the machine.) While pulling the panel towards you (as described in step 1), press the screwdriver downward as indicated by the green arrow. Increase the force at both points slowly until the tab in the center of the panel is released.
|
|
| 4 |

|
Now work along the side of the panel most convenient to you. Along each side there are two tabs just like the one now exposed along the top. Release the top one first and then the bottom one using much the same method as when you released the top tab in step two.
|
|
| 5 |

|
Once the two tabs along the edge are free, the remaining three tabs can be easily freed and the panel removed.
|
|
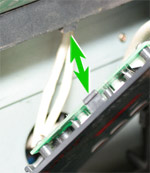
| 6 |
|
For your reference, here is an image of the tab along the top of the control panel. There are a total of six tabs- two along the right side, two along the left side, and one each on the top edge and the bottom edge.
|
|
| 7 |
The process to remove the two connectors and to remove the control board from the panel is detailed in: Control Board
|
|
| 8 |
When replacing the control panel on the machine, frist be sure that the connectors for each of the two cables are properly attached to the control board. Then snap the panel back into place, starting at the bottom, then working up along the sides, and finally snapping the top into place.
|
|
To complete the process, if necessary, reassemble the following:
Replace Rear Cover
Replace Fan
|